Nuggets of News Blog
|  |
Saturday, March 01 2014
 Some say that "gold is where you find it" and while that may be true, once you arrive at a known gold-bearing location, how do you decide where to dig first? Successful prospectors follow different methods, so there is no single "right" way, but no matter if you are sluicing, dry washing, or metal detecting, if you first consider the "lay of the land" you can better pinpoint a place to start. Some say that "gold is where you find it" and while that may be true, once you arrive at a known gold-bearing location, how do you decide where to dig first? Successful prospectors follow different methods, so there is no single "right" way, but no matter if you are sluicing, dry washing, or metal detecting, if you first consider the "lay of the land" you can better pinpoint a place to start.
Natural Factors to Consider Before Digging for Gold:
- Types of Placer Deposits. Alluvial, residual, beach, and other types of placer gold are all worked differently. Alluvial gold forms in streams. The gold tends to concentrate on bedrock as it moves downstream and makes its way down through the gravel to bedrock. Residual placers form on the surface as rock materials weather and are washed or blown away and do not concentrate on bedrock. Knowing the type of placer makes a big difference as to where you should begin to look for it.
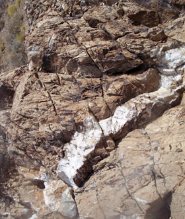
- Quartz Veins. Gold often forms with quartz, so quartz veining can be a very positive sign. Quartz is very resistant to weathering, so it may hang around on the surface long after any nuggets have sunk below the soil. If you find a visible quartz vein outcrop, that can be a good sign. The outcrop, as well as any areas downhill from it, should be sampled. Also remember that not all vein quartz is white. Some can be stained red-brown from iron.
- Iron Staining. Not all gold-bearing mineral deposits contain quartz. Gold-bearing veins can consist of calcite or mostly sulfides which often weather into iron-stained spots as the pyrites convert to iron oxides. While quartz is often a good indicator, it is not necessary for the formation of gold nuggets— but sulfur is necessary. In places where gold occurs with quartz, there is often a lot of iron, which was once (before it was oxidized) a sulfide such as pyrite. Any gold that was formed in these deposits is left in the red soils that remain, or perhaps nearby. The red soils can be deep orange or red-brown or brick red.
- Favorable Rocks. The type of rock considered "favorable" will vary greatly based on the area. The same "favorable" rock in California may not be the same "favorable" rock for finding gold in Alaska. In some places the best rock to look for might be schist or slate, in other places it might be volcanic. In general, sedimentary rock is usually not a favorable host rock for gold.
 Man-Made Factors to Consider Before Digging for Gold: Man-Made Factors to Consider Before Digging for Gold:
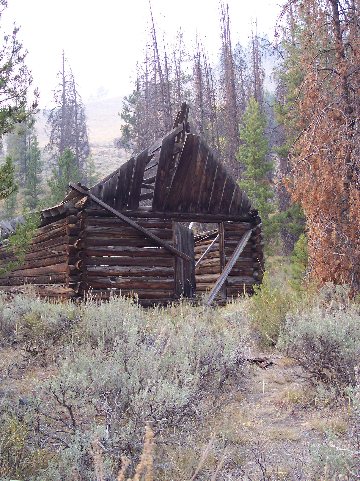
The sites of small, old-time mining operations can be some of the best places to look for gold. After all, the old-timers didn't have the modern-day equipment that you have, so they left a lot behind. Depending on their age, these sites from yesteryear can be overgrown, but if you look for these indicators they will help you consider where to dig first:
- Ground Cuts. These are narrow trenches in the ground that carried the gravels to the sluice box.
- Rock Piles. Sometimes old-timers encountered rocks that were too large to pass through their sluices under the water pressure they had to work with, so bigger rocks were picked out by hand and tossed aside. Piles of rocks make an easy marker. Any quartz you find in rock piles should be checked with a metal detector— you might find a gold-quartz specimen that's worth a pretty penny. Rock piles can be visible in the desert as well. Although the old-timers were not sluicing in the desert, they used dry washers that had to be screened for coarse rocks. If you see a series of short rock piles a few feet in diameter that cover an area that seems to have been dug out, you can reasonably assume you have found an old dry wash site.
- Hydraulic Mine Workings. A sign that an area has been worked by hydraulic mining are the steep banks left behind when the gold ran out (or so they thought). These sites are also commonly marked by piles of big stacked rocks.
- Shafts. Miners sometimes dug deep shafts or adits to access gold veins. These working are usually easy to spot even today. If the dumps consist of rounded gravels, it is most likely from underground placer diggings. If the dumps contain angular broken rock, that would indicate blasting from lode mining.
Deciding where to dig first comes from knowledge. You get that knowledge from reading books and magazines dedicated to prospecting and metal detecting, talking with experienced old-timers, and GETTING OUT IN THE FIELD. Evaluate the area, think about the geology, and then make a plan before you dig. You may not always hit upon a promising location by considering the factors listed above, but your chances for success greatly increase. Be flexible, keep sampling, and try again if you don't have any luck at first. Spending a little time evaluating an area can lead to a much more productive hunt, because after all, "gold is where you find it."
Saturday, February 15 2014
Among the many improvements made to mining technology during the Industrial Revolution, perhaps the most important involved drilling and blasting. In the early days, black powder, a relatively low-power explosive was the only blasting agent available. To use it, holes had to be pounded into rock by hand. Working in teams of two, one miner would hold a pointed steel chisel while the other hit it with a sledge hammer. Each hole had to be hand drilled to six or eight inches in depth. Needless to say, this was slow, tedious, and tiring work. During a 10-hour shift, a team could typically drill, load, and fire black powder charges in only eight or 10 holes. Depending on the size of the mine tunnel, that single blast could bring down three quarters to two and a half tons of rock.
Dynamite, an explosive five times more powerful than black powder, was invented in 1866 by Swedish chemist, Alfred Bernhard Nobel (the Nobel Prizes awarded today were named after him). Nobel held 350 different patents; dynamite is his most famous claim to fame. By the mid 1870s, dynamite had largely replaced black powder in the mines.
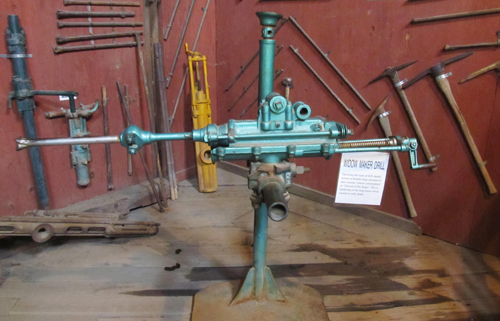 Around the same time period, pneumatic machine drills were first developed. Compressed air to power the drills was piped underground from large steam-powered compressors located at the surface. Machine drills could accommodate five to six foot drill steels that were capable of drilling three to four foot holes into sold rock in a matter of minutes. This new drill increased the tonnage of rock that could be blasted by two-man teams of miners to between four and 10 tons per shift. But, the new technology was not without hazards— namely the disease of silicosis. Machine drilling created clouds of razor sharp microscopic silica dust that miners breathed into their lungs. It took only a few years of operating this drill for a miner to develop this incurable disease. Around the same time period, pneumatic machine drills were first developed. Compressed air to power the drills was piped underground from large steam-powered compressors located at the surface. Machine drills could accommodate five to six foot drill steels that were capable of drilling three to four foot holes into sold rock in a matter of minutes. This new drill increased the tonnage of rock that could be blasted by two-man teams of miners to between four and 10 tons per shift. But, the new technology was not without hazards— namely the disease of silicosis. Machine drilling created clouds of razor sharp microscopic silica dust that miners breathed into their lungs. It took only a few years of operating this drill for a miner to develop this incurable disease.
Unfortunately, thousands of hard rock miners died before J. George Leyner of Denver, Colorado invented a better machine drill that all but eliminated deadly silicosis. The improved drill forced water into the drill hole and created a harmless mud out of the drill shavings. The mud acted as a very efficient wet grinding compound while also cooling the drill bit, and the flow of water flushed out the drill hole. Leyner patented his mechanism in 1897. This type of drill hasn’t changed much over the years, and is still used in modern-day hard rock mines.
Sunday, February 02 2014
According to a recent article posted on foxnews.com, a mining supply company located in Auburn, California reported that business has been up by 10 percent. The boon in business is because in Placer County, rivers have dropped to historically low levels, opening new possibilities for prospectors.
"Stuff that's normally submerged in water is now available," said James Hutchings, Sacramento chapter president of the Gold Prospectors Association of America. "The exposed cracks and crevices can hold chunks of gold that have washed down from the mountains."
If you are heading to Auburn hoping to spot something shiny, also take some time to enjoy Old Town and learn the area's rich gold mining history. California State Highway 49, also known as the Gold Rush Highway, winds its way through a nine-county area that in the mid 1800s was home to more than 2,500 gold mining camps. Most of those camps disappeared after the gold ran out, but a few communities survived and even thrived. Auburn is one such city.
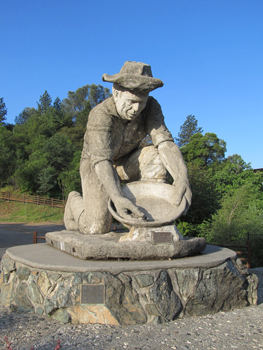 Auburn was put on the map in 1849 by Claude Chana, who is credited with making the first gold discovery in this area. The Frenchman originally worked as a cooper for John Sutter when James Marshall discovered gold on January 24, 1848 in nearby Coloma, the birthplace of the California Gold Rush. Like many other men bitten by the gold bug, the Frenchman quit his job at Sutter Mill to search for the shiny stuff. But unlike many men, his gamble paid off and he quickly recovered $25,000 worth of gold in Auburn Ravine. Chana is memoralized by a monument you’ll see upon entering Old Town from Interstate 80. The sculptor, Dr. Kenneth Fox, was a local dentist in Auburn and is famous for his large concrete statues. Auburn was put on the map in 1849 by Claude Chana, who is credited with making the first gold discovery in this area. The Frenchman originally worked as a cooper for John Sutter when James Marshall discovered gold on January 24, 1848 in nearby Coloma, the birthplace of the California Gold Rush. Like many other men bitten by the gold bug, the Frenchman quit his job at Sutter Mill to search for the shiny stuff. But unlike many men, his gamble paid off and he quickly recovered $25,000 worth of gold in Auburn Ravine. Chana is memoralized by a monument you’ll see upon entering Old Town from Interstate 80. The sculptor, Dr. Kenneth Fox, was a local dentist in Auburn and is famous for his large concrete statues.
By 1860, Auburn was a substantial city with a population of about 1,300. Many gold miners using sluices and rockers made $1,200 to $1,500 a day here. Today, the population is about 13,000 and most residents are not prospectors, they are store owners or attorneys, or work at the county courthouse. Although fires swept through Auburn’s wooden buildings in 1855 and 1857, many businessmen rebuilt using brick and those are the buildings you see today. Nearly all of these historic structures are still used, many functioning in new ways and housing contemporary businesses.
There are over 60 restaurants, taverns, antique shops, art galleries, and unique specialty stores in Old Town. Check out the irregular shaped post office on Lincoln Way. It dates to1857 and was built directly over a branch of the Auburn Ravine (a stream still flows directly below). This post office is the oldest one in California housed in its original building, and is also the oldest continually operated post office west of the Mississippi.
If Old Town seems vaguely familiar to you, it’s because it was featured in the 1996 film Phenomenon starring John Travolta, Kyra Sedgwick, Forest Whitaker and Robert Duvall. The crew filmed for a month in the fall of 1995 on Sacramento Street, as well as at places such as a bar, apple orchard, county courthouse, a park, and a lawyer's office.
Roughly 125 million ounces of gold were taken from the hills in California’s famed “Gold Country” during the Gold Rush. Auburn was lucky in that it survived the boom and bust cycles typical of early towns. Conveniently located at the junction of Interstate 80 and Highway 49, it’s easy to stop in and experience a bit of its golden history.
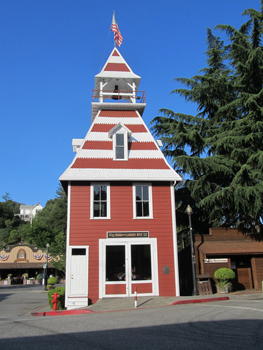 
Before becoming one of Auburn’s most famous attractions (corner of Lincoln Way and Commercial Street), this 1891 red and white firehouse was home to the Auburn Volunteer Fire Dept., one of the oldest volunteer groups west of the Mississippi. Organized in 1852, this group is still fighting Auburn fires.
The Placer County Courthouse at 101 Maple Street was completed in 1898 and is listed on the National Register of Historic Places. It also houses a FREE museum that presents an overview of Placer County history and a nice collection of Native American artifacts. One of the best exhibits is 194 ounces of raw gold mined from Placer County soil.
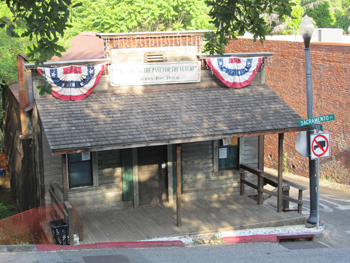
Known as the Joss House, this structure at 200 Sacramento Street in Auburn, California was built after the fire of 1855. It served as a temple and house of worship for the area’s Chinese population. In the 1880s, this block of Sacramento Street was known as “Chinatown Hill.” The Chinese concentrated here and operated laundry shops, opium dens and card rooms. Brewery Lane, just north of the Joss House, was the entrance to Auburn’s “red light district.” During the district’s illustrious history, a pious man seeking to burn out the ladies also unfortunately burned out some of the Chinese settlement.
Saturday, January 11 2014
For thousands of years, humans have been prospecting, mining and refining metals. The invention of smelting was a true technological advancement for mankind and marked the end of the Stone Age. Working with native metals such as copper, silver, gold, lead, and tin came first. These metals have fairly low melting points and the ability to cast and forge them was revolutionary. The Bronze Age was born when tin was mixed with copper, creating the first alloy and better weapons of war. 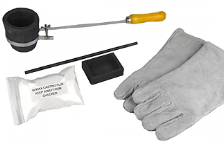
As the centuries passed, metallurgists tried to figure out how to smelt iron. Iron doesn't occur in its native form and melts at a far higher temperature than any of the metals that had been smelted previously. By developing an ingenious process, iron was at last smelted, forged, and put to good use. Thousands of years have passed since the Iron Age began, and since then many exotic compounds have been created to support our quest for better and better technology.
Whether you've recovered natural gold (nuggets, flakes, wire gold, pickers, flour gold) or have unwanted jewelry or beat up old coins, you can smelt these at home. Choices for doing so include a small but high-powered electric furnace, a torch, or a small portable melting kiln kit you can also take into the field. To get started, you will also need basic gold smelting supplies such as flux, crucibles, tongs, ingot molds, and safety equipment.
Professional mining companies recover gold and other precious metals in quantities sufficient enough to pay refiners to do the smelting for them. But now you can smelt or melt your own gold, silver, and other metals at home!
Wednesday, January 01 2014
Mark your calendars to attend a Gold Show in 2014!
Gold and Treasure Expos sponsored by the Gold Prospectors Association of America (GPAA) are open to the public. Admission is $5 for adults; free for kids under 12. Each paid attendee will receive a 14 inch GPAA Gold Catcher Gold Pan and a copy of Gold Prospectors, the GPAA’s national magazine. Also, the first 100 paid attendees will receive a free vial of real gold!

Jan. 18-19: Mesa Convention Center
263 N Center St,
Mesa, AZ 85201
(480) 644-2178
Jan. 31-Feb. 1: Douglas County Fairgrounds Complex
2110 Frear St.
Roseburg, OR 97471
(541) 957-7010
Feb. 22-23: Fresno Fair Grounds
1121 S Chance Ave, Fresno, CA 93702
(559) 650-3247
April 12-13: Antelope Valley Fairgrounds
2551 W Avenue H
Lancaster, CA 93536
(661) 206-0427
April 26-27: South Point Hotel & Casino
9777 Las Vegas Blvd.
South Las Vegas, NV
(866) 796-7111
May 10-11: Puyallup Fair and Events Center
110 9th Ave. SW
Puyallup, WA 98371
(253) 845-1771
ALSO MARK YOUR CALENDARS for the...
2014 Gold Prospecting & Mining Summit
April 5 & 6, 2014
Eldorado County Fairgrounds
Placerville, California
10am - 5pm, Sat. April 5 and 10am - 4pm, Sun, April 6
After a hiatus last year, this Summit returns to the Eldorado County Fairgrounds and features 80 booths with the latest in prospecting and mining equipment. Sponsored by ICMJ's Prospecting and Mining Journal, a team of writers and experts will be on hand to provide you with the information you need to succeed at gold prospecting and gold mining.
Lecture topics include:
- Basic Gold Prospecting Techniques
- Current Regulations
- Staking and Holding Mining Claims
- Setting Up A Placer Operation
- Mineral Identification
- Detecting for Gold
- More!
And back by popular demand... Two Additional Days of Hands-on Training! Admission is $5 at the door. Fairgrounds charges $5 parking per day. No pre-registration required for the Mining Summit, but pre- registration is a good idea for the Hands-on Training classes.
Sunday, December 01 2013
Dry washers are like highbankers except they do not use water to recover gold. While wet processing is nearly always faster and more efficient, especially for fine gold, dry washers are the best tool for recovering gold nuggets, pickers, and flakes from dry materials in the desert or other areas where water is not plentiful.
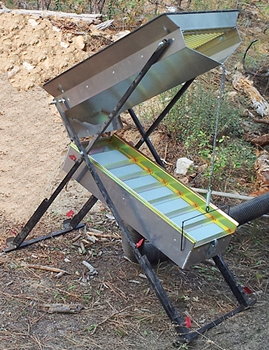 Drywashers are operated by shoveling gold-bearing gravels into an upper box which is covered with a screen. The larger rocks that are too big to pass through the screen slide off. Gravel small enough to go through is fed down into the lower gold recovery box, which is an inclined trough with cross riffles much like a sluice. The bottom of the recovery box consists of a thin, light-weight porous cloth. Beneath the riffle box is a blower that pulses air up through the cloth. The vibrations and air flow, combined with the shaking and classifying action of the dry washer allows the gold to settle to the bottom where it is captured in the riffles. Drywashers are operated by shoveling gold-bearing gravels into an upper box which is covered with a screen. The larger rocks that are too big to pass through the screen slide off. Gravel small enough to go through is fed down into the lower gold recovery box, which is an inclined trough with cross riffles much like a sluice. The bottom of the recovery box consists of a thin, light-weight porous cloth. Beneath the riffle box is a blower that pulses air up through the cloth. The vibrations and air flow, combined with the shaking and classifying action of the dry washer allows the gold to settle to the bottom where it is captured in the riffles.
Keep these tips and tricks in mind when using a dry washer:
• Moist soils and clay cause problems, so be sure to crush lumps of clay and dry your dirt in the sun (plastic tarps are ideal) before running through your dry washer. Surface soils might seem dry, but if you dig down a few inches, you may find moisture in the soil that will cause your sand, gravel, and gold to stick together.
• Double-check all the "throw away" rocks. Scanning them with a metal detector is a great way to ensure you're not tossing aside gold-laden rocks. Also, don't assume old tailings piles have been totally worked out. This is another time to use a metal detector because ordinary rocks could be laced with gold and completely over-looked by earlier prospectors.
• Consider using a dry gold vacuum to clean out crevices in bedrock. Feed the material that you sucked up into your vacuum bucket into your dry washer.
• Drywashing can be a very dusty process, so try to stay upwind as much as possible and wear a dust mask.
• Do a clean up every couple of hours, or after processing roughly one to two yards of material.
Looking for a drywasher? The Gold Buddy brand is available in 4 sizes and also check out the new heavy duty
Gold Storm dry washer. Whichever you choose, SAVE $10 with coupon code TAKETEN at check out. Offer expires Dec. 31, 2103.
Thursday, November 14 2013
If you've been prospecting for gold using a pan, sluice, highbanker or other traditional piece of equipment, there's another tool you may want to consider— a metal detector. Gold detectors are not necessarily higher in cost than an all-purpose detector, but they are built with a higher sensitivity to pinpointing pieces of gold, and have better ground balancing and discrimination abilities.
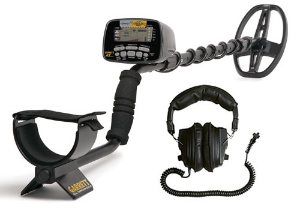 If you're not familiar with metal detecting, the first thing you should know is that your detector does not actually detect metal directly. It detects magnetic fields. When switched on, your VLF (very low frequency) detector first creates a magnetic field and energizes anything in the ground that responds to a magnetic field. Next, your detector seeks to find a magnetic field that has a response to its initial magnetic field. Because metals conduct electricity, they respond to a magnetic field and generate a small magnetic field of their own. Detectors detect the secondary magnetic field that conductive targets create whey they are energized by the first magnetic field sent into the ground by your detector. In general, the larger the metallic target, the larger and longer and stronger its magnetic response will be. If you're not familiar with metal detecting, the first thing you should know is that your detector does not actually detect metal directly. It detects magnetic fields. When switched on, your VLF (very low frequency) detector first creates a magnetic field and energizes anything in the ground that responds to a magnetic field. Next, your detector seeks to find a magnetic field that has a response to its initial magnetic field. Because metals conduct electricity, they respond to a magnetic field and generate a small magnetic field of their own. Detectors detect the secondary magnetic field that conductive targets create whey they are energized by the first magnetic field sent into the ground by your detector. In general, the larger the metallic target, the larger and longer and stronger its magnetic response will be.
PI (pulse induction) detectors work a bit differently by putting magnetic field energy into the ground and then switching off and waiting a very short period before they start to look for a response. This makes them better at handling ground mineralization than a VLF detector because during that short delay the magnetic response of iron trash minerals that you don't want to find dies out, but the signal from tiny bits of buried gold does, too. VLF detectors are more sensitive to finding the smallest bits of gold, but do not as easily cancel out ground mineralization.
Read more how-to info and articles here.
Friday, November 01 2013
At first glance, metal detecting seems like the least demanding form of prospecting for gold. But it has its share of challenges, too, just like sluicing, drywashing, or panning by hand. Whether you've been swinging a metal detector for years, or just purchased your first machine, there might be a few things you could do to increase your chances of uncovering a piece of buried gold. 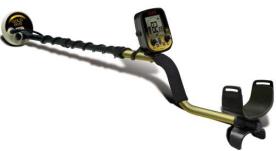
• Properly tune your detector. Whether it's a $200 or a $5,000 model, the settings are important to get right -- especially Ground Balancing and Gain/Sensitivity. Goldfields are usually heavily mineralized, which can make it really frustrating to know a false target from a real one, so follow the manufacturer's directions for ground balancing and do it often. Ideally, the Gain/Sensitivity is run as high as possible while maintaining a stable threshold as you swing. Try pumping your coil up and down during ground balancing.
• Control the Coil. The coil should be kept level and close to the ground from one end of your swing to the other. If your swing arcs and the coil is coming off the ground several inches on the ends, you may get false signals and lose a lot of depth. Also, don't swing too slowly. A Pulse Induction (PI) detector performs better with a slower swing, but a Very Low Frequency (VLF) machine needs to be swung faster to detect targets.
• Target Recovery. If you have ever "lost" a target after you first heard it, try this: after pinpointing, start digging until you have moved a small pile of dirt. Pass the material from your pile, one scoop or handful at a time, over the TOP of the coil. You will have better target recovery if you move the target first.
Gold detectors are not necessarily higher in cost, but they are built with a higher sensitivity to detecting gold nuggets, have better ground balancing and discrimination abilities. Reading your owners' manual cannot be stressed enough. Once you know how to use your detector, then practice makes perfect. Sometimes success comes after just making a few small adjustments and getting out in the field as often as you can. If you're shopping for a gold detector, click here for ideas. Good luck and have fun!
Nugget of News Blog
Sunday, October 27 2013
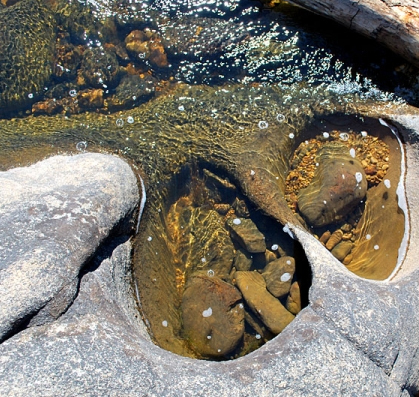 When you think about pot holes, you probably picture annoying driving hazards in the middle of the road that you try to avoid at all costs. That hole in the asphalt can cause a flat tire and help throw your car's alignment out of whack! But a pot hole in a rock that's located in a gold-bearing stream or river is something you DON'T want to steer clear of the next time you're out prospecting. When you think about pot holes, you probably picture annoying driving hazards in the middle of the road that you try to avoid at all costs. That hole in the asphalt can cause a flat tire and help throw your car's alignment out of whack! But a pot hole in a rock that's located in a gold-bearing stream or river is something you DON'T want to steer clear of the next time you're out prospecting.
One way a natural rock pot hole is formed is when sand, pebbles and small rocks are spun around on bedrock by river currents. As they spin, they work like a drill and slowly grind away at the rock. In the process, the stones and pebbles caught in the hole wear away at themselves as well as the bedrock until they are swept away by the current and replaced by other pebbles, sand... or bits of GOLD! This type of natural drilling has taken place in most California rivers for thousands of years, but you can expect to find potholes in just about any river that has a rocky bed, especially if it's made of limestone, granite, or lava. Some holes are a few inches in diameter and depth, others can be quite large.
There are basically two kinds of potholes in bedrock channels -- vertical and lateral. Vertical potholes formed on rock surfaces that were at one time part of the channel's rock floor. These potholes are now exposed because that portion of the channel has been raised above the active river or is just below the surface, making them pretty easy for you to spot. Lateral potholes are cut into the rocky sides of channels or into sides of rocks that stuck out of the channel as mini-islands. Lateral potholes formed near the river's surface, where rock, water and air meet, instead of at the river bottom.
In the same way that tree roots, huge logs, and big boulders can catch gold as it is moved downstream by fast-moving water, rock pot holes are natural gold catchers, too. Rocks and debris can settle in the pot holes and act as a "cap" for bits of gold that are also washed into the depression. Often the cap will completely hide gold that is underneath it... that is until some lucky prospector like you comes along, knowing where to look, and moves the cap out of the way to expose the gold. Eureka!
Thursday, October 24 2013
There is probably no more appropriate place for a mineral museum than in Butte, Montana, better known as the Richest Hill on Earth. The state itself is nicknamed The Treasure State, so with monikers like those, you know you’re going to see a lot of prized specimens! Situated on the Montana Tech Campus, the Mi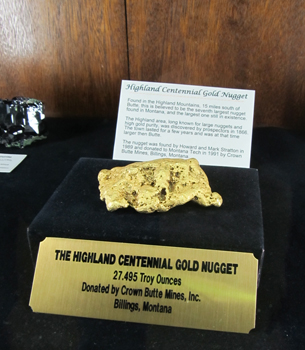 neral Museum is free and open to the public. While the museum’s collection numbers more than 15,000 specimens, about 1,300 from Montana and around the world are currently on display. neral Museum is free and open to the public. While the museum’s collection numbers more than 15,000 specimens, about 1,300 from Montana and around the world are currently on display.
One of the highlights in the Mineral Museum is the “Highland Centennial Gold Nugget” weighing 27.5 troy ounces. The nugget got its name because it was found in the Highland Mountains south of Butte in 1989. The nugget is believed to be the 7th largest gold nugget found in Montana. A 400-pound smoky quartz crystal, referred to as “Big Daddy,” was unearthed just east of Butte. Because of Montana’s long tradition of mining, you’ll see impressive examples of colorful bornite, garnet, azurite, agate, sapphires, and more. If you want to take a sample home, you’ll find small pieces for sale in the gift shop. There’s also a good selection of books relating to minerals.
Don’t miss the museum’s display of fluorescent minerals. Cases are in a separate room and are illuminated in both long and short wavelength ultraviolet light. It’s amazing how ordinary-looking minerals radiate extraordinary vibrant shades of pink, orange, and blue when exposed to ultraviolet light. You won’t believe how halite (also known as salt) changes from white to red. Kids especially think it’s just plain fun being in the Fluorescent Room surrounded by a crazy glowing rainbow of rocks!
The Montana Bureau of Mines and Geology Earthquake Studies office is also located in the Mineral Museum. Watch the seismic activity from Montana and around the world as it is recorded and printed on the seismographs.
IF YOU GO
Montana Tech Mineral Museum
Montana Tech Campus
1300 West Park St. • Butte, MT 59701 • (406) 496-4414
- Summer Hours: Daily, 9 AM – 5 PM (June 15 through September 15)
- Winter Hours: Weekdays, 9 AM – 4 PM
- Admission is Free, although donations are appreciated.
- Elevator Access to the Mineral Museum is located between the Museum building and the Chemistry building on the campus of Montana Tech.
|


 Around the same time period, pneumatic machine drills were first developed. Compressed air to power the drills was piped underground from large steam-powered compressors located at the surface. Machine drills could accommodate five to six foot drill steels that were capable of drilling three to four foot holes into sold rock in a matter of minutes. This new drill increased the tonnage of rock that could be blasted by two-man teams of miners to between four and 10 tons per shift. But, the new technology was not without hazards— namely the disease of silicosis. Machine drilling created clouds of razor sharp microscopic silica dust that miners breathed into their lungs. It took only a few years of operating this drill for a miner to develop this incurable disease.

 Drywashers are operated by shoveling gold-bearing gravels into an upper box which is covered with a screen. The larger rocks that are too big to pass through the screen slide off. Gravel small enough to go through is fed down into the lower gold recovery box, which is an inclined trough with cross riffles much like a sluice. The bottom of the recovery box consists of a thin, light-weight porous cloth. Beneath the riffle box is a blower that pulses air up through the cloth. The vibrations and air flow, combined with the shaking and classifying action of the dry washer allows the gold to settle to the bottom where it is captured in the riffles.

 When you think about pot holes, you probably picture annoying driving hazards in the middle of the road that you try to avoid at all costs. That hole in the asphalt can cause a flat tire and help throw your car's alignment out of whack! But a pot hole in a rock that's located in a gold-bearing stream or river is something you DON'T want to steer clear of the next time you're out prospecting.