Sunday, August 20 2017
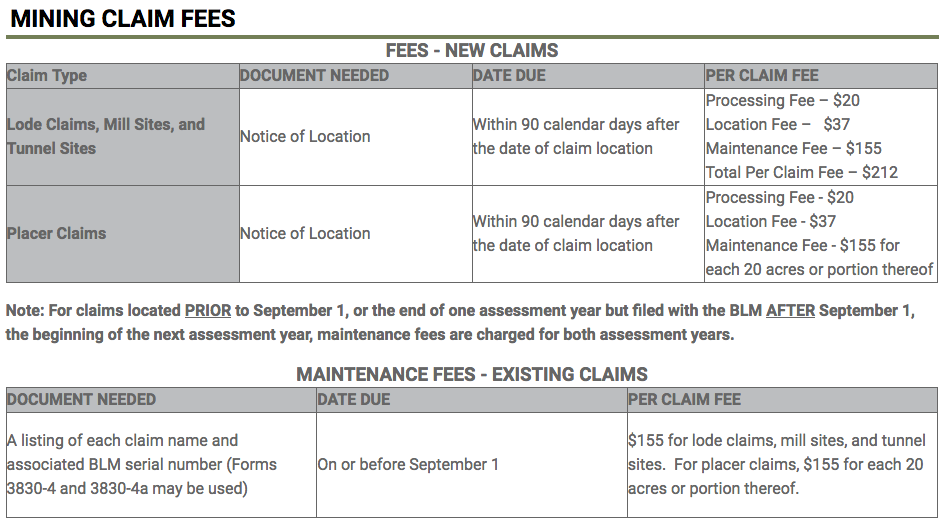
September 1st of every year is a very important date if you own a mining claim, mill site or tunnel site. That's Maintenance Fee Payment Waiver Certification (Small Miner’s Waiver) The maintenance fee and small miner’s waiver must be paid or filed in the Bureau of Land Management (BLM) state office (in Alaska, the Fairbanks District Office also accepts fee payment) of the state where the claim or site is located. If a claimant owns claims or sites in multiple states, a fee or waiver must be paid or filed in each state where each claim or site is located. Failure to timely pay the fee or file the waiver in the proper BLM office will subject your claims or sites to forfeiture by operation of law. Annual Assessment Work Assessment work is not a requirement for owners of mill or tunnel sites; however, a notice of intent to hold (NOIH) the site must be filed on or before December 30. The BLM requires a $10 processing fee per site for filing a NOIH. Claimants (except those in Alaska) may pay their annual maintenance fee online through the Mining Claim Maintenance Fee Payment Portal. This site is available 24 hours a day. The BLM payment portal provides the ability to query eligible mining claims and sites for payment through an interface with the Legacy Rehost 2000 (LR2000) public reporting database; select claims and sites to be paid; and then transfer to Pay.gov for payment of the maintenance fees for the selected claims and sites. At this time, only credit card payments are accepted and treasury limits apply. Claimants who file on paper must include a document listing the claim/site name(s) and the BLM serial number(s) assigned to each claim for which the fees are being paid. Form 3830-5 (lode claims) and Form 3830-5(a) (placer claims) may be used to list claims and sites when making payments by check or credit card directly to the BLM state office for the state where the claims or sites are located. Sunday, July 02 2017
Every prospector has his or her own opinion as to the best material to have under the riffles of your sluice box—
Wednesday, June 14 2017
Fun and exercise are two great reasons to go gold prospecting, but you might as well make some money while you're at it, right? The best way to do that is to increase production rates. Assuming you are mining on a known gold-bearing claim or waterway, volume is the key to your success!
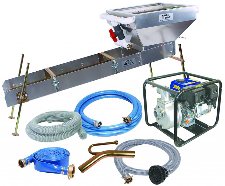
A dredge or highbanker/suction dredge combo is the next step up. A dredge uses a gas motor to generate the suction that will load and transport the material to the sluice, which greatly increases volume, as well as allows you to reach gravel on the river bottom that would otherwise be inaccessible (unless the river is seasonal or there is a prolonged drought). The more material a dredger can push across the riffles, the more gold can be recovered. An additional benefit to dredging is that it also allows you to clean gold out of all the cracks and crevices in the bedrock. A shovel just cannot do that. The size of the dredge intake nozzle is the most important factor in how much material a dredge can process, but it is not a direct one-to-one relationship. For example, a 5 inch dredge will not move twice the material that a 2.5 inch dredge can move. It actually can move much more. The surface of the hose is figured in square Beyond dredges or highbanker/suction dredge combos, you can get into some professional mining set-ups that use trommels and jigs and shaker tables and earth moving equipment. Every deposit is different, varying in size and grade and structure. Environmental conditions and access will dictate mining methods and knowing the rock types and size of the gravel is critical in determining which equipment will work best for increasing your production. Finding a suitable deposit to mine and finding a way to work it economically— to justify your time and expense— is the first step. Then choose the right equipment to increase your recovery rate and speed of recovery and make more money. Good luck! Saturday, April 29 2017
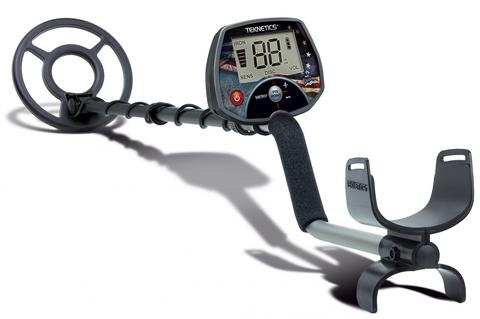
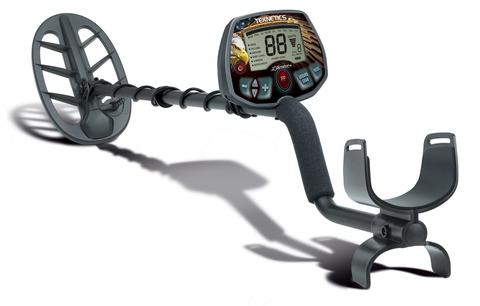
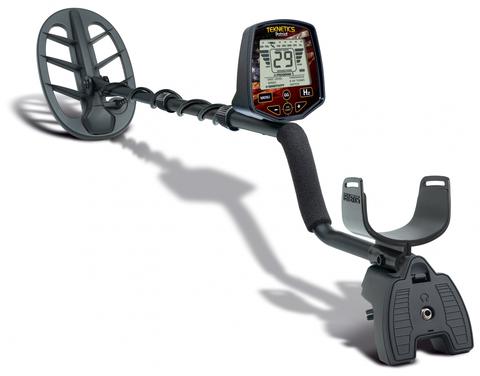
The NEW Ameritek metal detectors have arrived! The Minuteman, Liberator, and Patriot, are three new • Turn-on-and-go, well balanced and lightweight Click here to get it for $199 AND FREE SHIPPING AND FREE ACCESSORY KIT with coupon code A1486 Liberator • V-Break, variable tone breakpoint Click here to get it for $299 AND FREE SHIPPING AND FREE ACCESSORY KIT with coupon code A1486 Patriot • Detects coins to 12 inches Click here to get it for $399 AND FREE SHIPPING AND FREE ACCESSORY KIT with coupon code A1486 Guidelines for All Metal Detectorists Realize that each time you go detecting you will be representing EVERYONE in this sport; all will be judged by your actions. Detectorists are a very visible group and the public knows what you are doing. That is why you must conduct yourself accordingly, learn proper recovery techniques and abide by a code of ethics. Scars from improper or sloppy recovery methods can remain for years and further damage the image of this activity. This can only lead to tougher laws and regulations. Even in remote areas it is very important to always leave no sign you were there. Learn about your local laws regarding metal detecting, especially on Federal, State or County lands, because they can vary significantly from state to state. Make the effort to search the local public records to verify the laws regarding metal detecting in your area BEFORE you go detecting. Do the same with State and Federal agencies that govern lands AND waters in your area. If you will be hunting on private property you MUST obtain permission ahead of time and be absolutely certain you know the exact boundaries of the property or yard. Check with your County land records office (usually County Seat) to obtain information on how to research or obtain land ownership plats. In some places this information is available online or you may be able to purchase a plat book for your County (some libraries also have copies you can view). These plat books are useful tools, showing owner’s name and boundaries, as well as Federal-, State-, and County-owned lands. However, it is your responsibility to still check with the land owner to verify the plat map is correct. Penalties and fines can be very costly. Ignorance of the law is not an excuse. Once you have a name, try to locate the owner’s address and pay him a visit. Introduce yourself, express your interest and ask if he would allow you to metal detect on his property. Explain your practices and how you will proceed. Always be polite, even if he turns down your request. If given permission, find out if there are any limitations he might have; certain times of the day, where to park your vehicle, certain areas that might be off limits, etc. Above all else, you must carefully cultivate the relationship between yourself and the land owner to ensure that you always have his/her best interest in mind. Often there may be others, such as hunters, using their property as well. Crop lands might be leased to a farmer; buildings may be rented or leased to other families. If your activities offend any other users, they will also offend the owner and that will reflect negatively on the sport. You may even get kicked off the property. When you are on private property, your actions and activities must always be beyond reproach. You must always put the owner’s concerns above all else. And this is just as true if you are in a City park or on school grounds. There are numerous cities across the country that have banned metal detecting on city property, and in nearly every case it is because of a careless detectorist that left holes and trash. Always respect the land owner! Your detector comes with the responsibility to detect and recover targets ethically. Your actions WILL affect the sport so be sure you portray yourself in the best possible way. Look for a local dealer or club in your area. They can offer up-to-date information on local conditions and laws, and teach you proper recovery techniques. Joining a club is a great way to give a stronger voice to the activity. You will find that club members have a strong stake in keeping the sport healthy by watching for violators or those not using proper recovery techniques. The goal of most clubs is to educate and teach those in this activity. With your ethical participation, you will help ensure we can all enjoy this activity for years and years. Please be responsible! Saturday, April 01 2017
Typical winter storms that regularly occur in gold-bearing areas usually do not create enough havoc to force substantial amounts of "new" gold into movement. However, when Mother Nature really goes to work over a “bad” winter, a great deal of gold can be set free, creating a bonanza for gold hunters in spring and summer. Gold veins that have been hidden for decades suddenly can be exposed. Floods can also sweep gold out of abandoned mines and wash it downriver. Known gold digs can be washed out, trees uprooted, and the landscape eroded— all pluses for prospectors! When tons of rock, cobble, and boulders are swept downstream along bedrock during a huge storm, quite a bit of destruction occurs. Plants, weeds, and trees that normally grow along the river and gravel bars are washed away. And when a major storm or flood tears up large portions of a streambed, a fair amount of this newly-released gold, because of its weight, will be deposited along the riverbed and settle into cracks and crevices (hand dredges are an ideal tool in this situation). Flooding on this scale occurred in Colorado in 2013. After the heavy rains in the west this winter (in California, Oregon, and Washington to name just a few affected states), this summer promises to be one of the best seasons for small scale miners in many areas. Even farmers in Thailand are looking for gold now to try and make up for the economic loss of ruined pineapple crops caused by floods. Stream bed layers caused by several floods over time are referred to as “flood layers.” Flood layers are usually a different color, consistency and hardness from the other layers of material within the streambed, making them easy to recognize. Larger, heavier pieces of gold will work their way down toward the bottom of a flood layer as they are washed downstream. The smallest and lightest flakes of gold might not work their way down through a flooding layer at all, but might remain dispersed within the material. Of course not all flood layers contain gold in large quantities, but it’s a good place to start. In early spring, rivers are still high in most places, but in the next few months, stream beds could be exposed for better gold hunting. Some of the best areas to look for flood gold are where the stream or river widens out, or levels out, or changes direction. These areas can allow concentrations of gold to collect either on bedrock or in the contact zones between layers. Another place that tends to collect gold are gravel bars, especially the ones located towards the inside of bends in a waterway. No one ever hopes that Mother Nature releases the type of fury that causes loss of life and property, but when a catastrophic weather event occurs in a gold-bearing area, take advantage of it. Get out there and get your share of the shiny stuff! With so much more runoff than normal shaking gold from them thar hills, the best prospecting will come in the summer months when the water has receded. Good luck and be safe! Wednesday, March 08 2017
You might think that glaciers are important to gold prospecting only in Alaska and the Yukon, but glaciers have also affected placer deposits in the Midwest and some western states, too. What is a glacier? Glaciers are formed when a huge mass of ice is created by accumulated snow. The body of ice grows over the years when more snow falls during colder months than melts during warmer months. Glaciers shrink when the melting is greater than the snow accumulation. Once the weight of the glacier grows large enough, the weight of the snow and ice presses down an Eventually the body of the glacier reaches a warmer elevation where the ice melts more easily. Here, at the foot of the glacier, are gigantic piles of rocks and boulders and debris that have been bulldozed down by the moving massive glacier. These glacial gravels are known as “moraines.” However, finding gold in this unsorted jumble of glacial moraine material produced by a glacier’s bulldozing effect is like finding a needle in a haystack—not worth the time to process…. until the glacier’s natural melt waters or another water source washes through it, and does a bit of natural sorting. Alluvial gold deposits Normal alluvial placer deposits form by the power of flowing water washing away lighter materials and gravels and leaving behind heavier material such as gold— very similar to what happens in a sluice box when the flow of water washes away the lighter materials and the gold is deposited in the riffles. When flowing streams and glacier melt water process and wash away the glacial moraine gravel, the gold works its way downward. Gold will then be deposited on bedrock or false bedrock (such as clay or other packed material). As the glaciers themselves melt, the huge quantity of water creates an effective sluicing system that can sort the gold out of gravels. These flows can leave behind very profitable pay zones along the channels cut by the ice melt waters on bedrock benches, among packed false bedrock gravels, and on the downstream side of bedrock high spots. Where to look for glacial placer gold deposits in the West In California, glaciers still exist in the southern Sierra Nevada, small parts of the Cascade ranges and the Shasta-Trinity Alps. In the northern Sierra Nevada and higher parts of the Klamath and Trinity ranges, that area’s placer deposits were greatly affected by glaciers that existed thousands of years ago. Glacial derived placer gold is important in a number of other western states, too, including Idaho (Boise Basin and Mount Pisgah), Montana (Pioneer District, upper portions of Gold Creek near Deer Lodge) and in Colorado (Fairplay District, Arkansas River Valley in southern Lake County). Where to look for glacial placer gold deposits in the Midwest What you might be very surprised to know is that glaciers are the source of nearly all the placer gold found across the Midwest. During the past ice ages (which were repeated events, not just a one-time occurrence), great sheets of glacial ice leveled the middle parts of North America, acting like giant bulldozers by pushing enormous amounts of material southward from Canada. When the ice melted, the area was left with extensive glacial moraine (gravel) deposits. Although it’s spotty and sporadic, some of these glacial deposits have gold, depending on where the glacial gravels came from in Canada and if that region was gold-bearing. Glacial gold is found in several of the northeast states such as New York, Vermont, and Pennsylvania. Glacial gold is also found more extensively in Midwest states such as Indiana, Illinois, Ohio, Michigan, Wisconsin, Iowa, Minnesota, Kansas, Nebraska, Missouri and the Dakotas. All things considered, while glaciers can destroy a placer deposit, the moraines they leave behind can produce some very worthwhile deposits of gold, and are worth prospecting if you live in or visit these areas. Sunday, January 29 2017
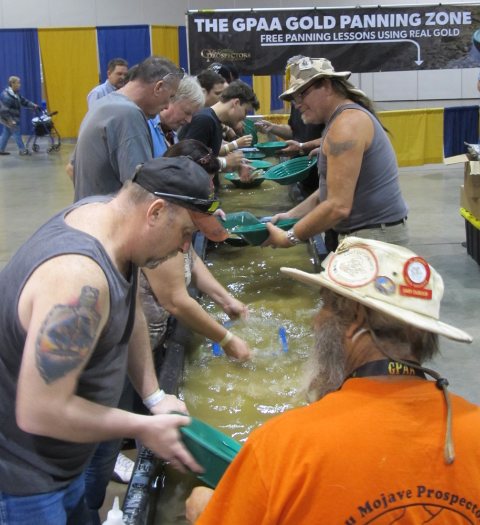
Make plans this spring to attend a GPAA Gold & Treasure Show! Whether young, old, or in the middle, the expos offer something for everyone and provide the best opportunities to learn new skills, see product demos, and rub elbows with some of the most respected miners and metal detectorists in the business! Also on the show floor are panning troughs for both kids and adults where you can learn new techniques— and keep all the gold you find! Saturday show hours 10 am - 5 pm and Sundays 10 am - 4 pm in these cities:
Visit the GPAA website for details and to buy your $5 adult tickets online ($10 adult admission at the door; kids 12 and under plus military and veterans with ID are free). Friday, December 02 2016
Metal detectors are electromagnetic devices and can detect items that are conductive or magnetic, or both. Gold is an example of a non-magnetic conductive item. Iron is both conductive and magnetic. Almost all major advances in prospecting metal detectors over the last 40 years revolve around improving ways to ignore and see through ground mineralization while still finding gold nuggets. If you’re using any brand of VLF (very low frequency) metal detector to prospect for gold, choosing the correct operating mode (also called search mode) can make or break your success. Experts recommend that any metal detector you are considering for gold prospecting should have a true all metal mode. This mode is important because of its lack of filtering applied to the signal. It will normally offer the best depth and the best sensitivity to small gold. Unfortunately, two common problems occur when using All Metal Mode: interference from ferrous iron and steel junk, and from hot rocks. A hot rock is nothing more than a rock that has a different magnetic content than the ground. Some rocks are that way because they contain conductive minerals besides gold. The Discrimination knob on your detector will help with these two problems. Discrimination is a type of electronic filtering. The signal is analyzed, and depending on the discrimination setting, identified as either a target to be dug or a target to be ignored. Applying more discrimination eliminates more trash, but be careful—you don’t want to completely eliminate all ferrous trash because an aggressive level of discrimination easily tunes out gold. So be prepared to still dig ferrous junk which usually turns out to be larger chunks of steel and iron. Also know that discrimination circuits can be fooled, especially in ground with lots of iron mineralization. This ground condition can override the small gold signal and cause a faint gold signal to be identified as ferrous. Even with this limitation, the discrimination mode can be invaluable for finding gold in extremely trashy areas. Trashy areas are where a VLF detector can really outshine a PI (pulse induction) machine, especially when dealing with nails, bits of rusted cans, and other small trash. If you’re in the market for a metal detector, some manufacturers offer special holiday packages such as the 3 listed below. You can also shop for Fisher, Garrett, Bounty Hunter, Minelab, Tesoro and Teknetics metal detectors here. Through Christmas only... FREE Recharge Kit and FREE 15” Coil and FREE Shipping with purchase of either Fisher F75 ($599) or Teknetics T2 ($499) detectors! Both machines are recommended for Coin Shooting, Relic Hunting, and Gold Prospecting. Garrett AT Pro holiday package ($594.96) includes detector, headphones, instructional DVD, Sunday, November 20 2016
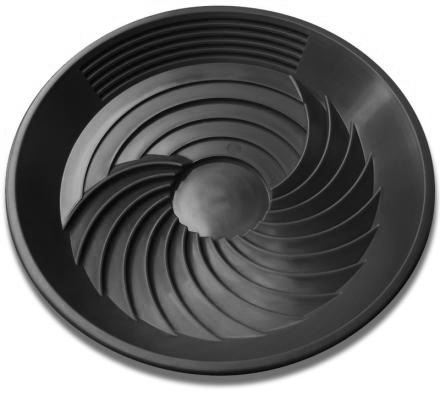
Recently, Gold Prospectors magazine published an article in the November/December 2016 issue about the Turbopan. Read an excerpt of that article below: Turbopan was designed by Kim Hillier, an Australian geologist and prospector with over 20 years experience in "A river is a natural sluice, and because a sluice is an excellent way of recovering gold, I designed the Turbopan to act like a sluice in a pan," explains Mr. Hillier. The pan's riffles act like a circular sluice and were designed to use gravity to accelerate the gold to the bottom of the pan. The bottom well of the Turbo pan is in the center of the pan-- as far away from the lip of the pan as possible, so you don't accidentally lose any of your precious metal. The design of the Turbopan combines the best features of the traditional batea, a deep conical shaped wooden bowl used as far back as the Mayans, and the basic copper pan used in the Klondike Gold Rush. The unique design allows the whole circumference of the pan to eject waste material and many more riffles trap much more gold. This is a huge advantage over traditional pans which tend to concentrate all material on one side of the pan. "The Turbopan is really fast!" says Hillier. "You've got maximum riffles if you're panning out over the front and also you can get the waste out before you start the clean up. It's sort of a bit of a hydrocyclone as well if used to its maximum ability, and its also good for wet sifting through gravels for gems." How to Use the Turbopan: 1. Place your material in the Turbopan. Be careful not to overload it. The pan is meant to hold up to about pounds. With the clean-up riffles facing away from you, submerge the pan into water, and then spin the pan counter-clockwise and then clockwise 180 degrees to allow the water to saturate the materials. TIP: Use a catch tub so you don't lose any gold in a fast-flowing stream! 2. Before panning, use your finger to feel the texture of the material in the bottom of the central trap. Does it feel too tightly compacted? If so, simply shake up the material for better stratification. 3. With your Turbo pan partially submerged, begin moving it in a counter-clockwise circular motion so that the material moves over the circular riffle bed. This action will break up clumps of dirt and prevent compaction. 4. Because gold-bearing black sands are much heavier than dirt and gravel, it will sink and become trapped in the spiral riffle grooves and gravity will move gold into the central trap. The circular motion creates centrifugal force, pushing light sands and clays to the outside of the pan, leaving the heavier black sands and gold in the center of the pan. Alternate between a "centering swirl" to get the gold-bearing heavies to the middle of the pan and the "lights" to the surface, and an "ejection swirl" to get rid of the waste materials. 5. Because the pan is shallow, you'll notice how easily you can clear the small rocks, pebbles and debris from the pan with a single sweep of your hand. 6. When the amount of material remianing in the pan barely covers the central trap, do two or three more clockwise swirls, then about five seconds of vigorous back-to-front and side-to-side motions. 7. Tilt the pan away from you and gently shake it side to side while tilting the pan up at about a 30 degree angle. 8. Pan off any waste until you have only a small amount of concentrates containing gold (about the diameter of a 50 cent piece). 9. Tilt the pan towards you and look for your gold in the bottom of the central trap. 10. If you see gold in the cleanup riffles, don't worry. With a little more practice you'll master your own technique. To watch how-to videos or shop for the Turbopan, click here. Tuesday, November 15 2016
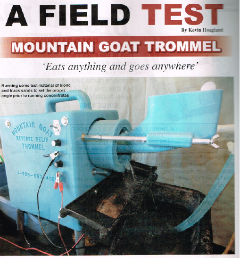
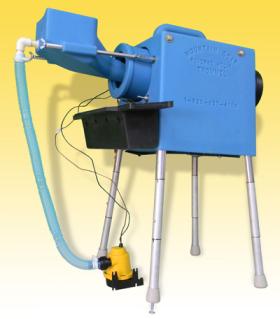
The Mountain Goat Trommel is not new to the prospecting industry by any means, but it has just recently been field tested by Kevin Hoagland, host of the GPAA-produced TV series Gold Trails. Kevin's complete Field Test was published in the November/December 2016 issue of Gold Prospectors magazine. Below is an excerpt or you can Download the complete Mountain Goat Field Test here (6-page .pdf). Invented by the late great Angus Niccolls who started Camel Mining, the Mountain Goat Trommel has a long history of excellent gold recovery and easy of use. It will handle .5 inch minus material with the optimal recovery The Mountain Goat is a variant of the Archimedean Screw, which is a tube surrounding a rotating screw used to pull a column of water up a grade. This makes it possible to easily lift water. In the Mountain Goat, the outer tube is lined with the screw, and as gold-bearing material is stratified by a stream of water and run through the tube, the heavier gold-bearing material is deposited into the reverse screw and brought to the top of the unit. The lighter waste material is continually washed and pushed through the unit into the tailings. In other words, when material enters the hopper, the gold goes one direction and the water goes the other. It’s really no different than huge trommels, except that the Mountain Goat does all of this in a unit that weighs less than 20 pounds, and recirculates about 10 gallons of water all day long. And if set up properly, the manufacturer says it can handle about two yards of material in a long day of running. The Mountain Goat Trommel is cleverly designed. It’s compact and almost completely assembled when you receive it. The carry handle is molded into the unit, making it easy to transport (especially if you are riding a quad or other vehicle). The trommel tube is pre-mounted to the unit with the nugget trap installed, needing no further assembly. The legs are collapsible and can be set to two different heights. Plus, the front legs are further adjustable to allow you to fine tune the unit to the material you’re working. The pump is 12-volt, and the flow rate was chosen to offer the best recovery possible. It is recommended that But before you use it for the first time, or if it has sat unused for a while, be sure to clean the unit with hot water and a little unscented dishwashing soap. Hook up the unit and allow the soapy water to do its job of removing the release agent that comes on just about any product that has been molded. Sponge down all surfaces exposed to water and the outside of the unit, too. This simple cleaning step can prevent gold loss. You might want to clean the machine outdoors as the soap bubbles can go everywhere! As you use the Mountain Goat, continually test the tailings. You should not see any gold. If you do, you may need to increase the angle of the unit by turning the screws on the front legs. It’s a bit of trial and error, just as it is when setting up a sluice in a stream. The Mountain Goat can be paired with the Desert Fox Spiral Wheel for a complete two stage concentrator and final recovery unit. Nugget of News Blog |
|
Nugget of News Blog |


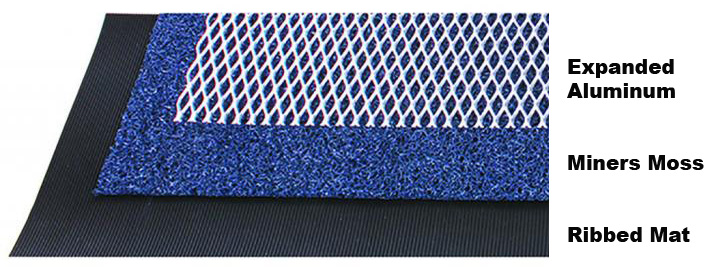 Deep V Matting, Carpet, or Miners Moss. There is no single right answer just like there is no single right answer for which brand or size of
 treasure finding machines from Teknetics with true blue American graphics on their faceplates. Proudly made in the USA by Fisher Labs, these units are making award-winning metal detectors affordable again! Whether you're looking for the ease of a turn-on-and-go coin shooter or want more features for gold prospecting, you will find it in the affordable Ameritek line. All three detectors feature waterproof searchcoils, large two-digit numeric displays, and are perfectly balanced and light-weight so you can swing all day. Click the links below to check out the features of each new machine and